Written by Leon Engelbrecht -20th Sep 20109127

Once upon a time, a battle was fought in a Biblical land.1 A great victory was won and their general was proud. But the years rolled by and now the battle is just another forgotten episode of a barely remembered conflict. Who but a few still remember the splendid South African victory at “Square Hill” or the repulse at Kh Jibeit in September 1918? There a Cape Corps battalion helped make the demonstration that helped Allenby break through to Damascus and knock the Ottoman Empire out of World War One.
In July 1918 1st Bn Cape Corps (1CC) was assigned to the 160th Infantry Brigade (T/BG VNL Pearson) of the 53rd (Welsh) Division (T/MG SF Mott). The division was assigned to 20 Corps (T/LG Sir Philip W Chetwode), one of several making up General (later Field Marshal Viscount) Edmund Allenby’s Egyptian Expeditionary Force. On the left or coastal flank was 21 Corps with the Desert Camel Corps behind it. 20 Corps was deployed across the Judean Hills that lay between the coastal Plain of Sharon and the stiflingly hot Jordan River valley. In that valley lay a mounted ANZAC (Australia New Zealand Army Corps) division, and to its east was the irregular Arab Army, led by Prince Feisal, son of the Hashemite Emir Hussein, then Sherif of Mecca and Medina2.
Liddell Hart writes that the operation “was one of the most quickly decisive and most completely decisive battles in all history. Within a few days the Turkish armies in Palestine had practically ceased to exist.”3 In this victory 1CC was to play a key role. Opposite Allenby’s Egyptian Expeditionary Force were three under strength Ottoman Armies (4th, 7th, 8th) – a feeble force perhaps, with 3000 horsemen, 32,000 infantry and 402 guns versus the British force’s 12,000 sabres, 57,000 rifles and 540 guns. But they were under the command of the victors of Gallipoli, where the Anzacs had suffered fearful casualties in an ultimately heroic but futile campaign – General Mustapha Kemal, later the founder of modern Turkey and today still known as Atatürk and German General Liman von Sanders.
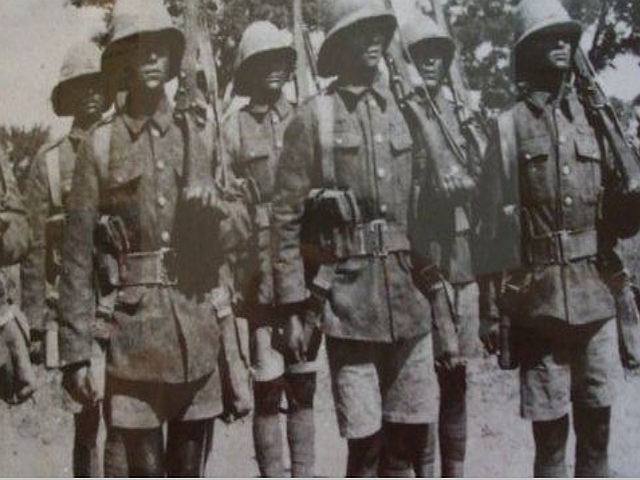
1CC was the first of two battalions raised for service in German East Africa (now Tanzania). As was the custom of the time, it was white officered but the men could rise in the ranks. As a result, the NCOs were, like the men, coloured. In command was LTC Morris. Major Hoy was second-in-command.
Veteran George Klinck recalled in the September 1967 Indaba4 that they were released from East Africa in December 1917. After home leave, they were shipped to Egypt. There they were ordered to guard duty at various Prisoner of War amps. “We begged to be allowed to take part in the fighting. General Allenby inspected us, and told us he would give us a chance to go to the front line.”
The place where 1CC entered the line was not far from the reputed site where Christ had met the Samaritan woman with the pitcher (John 4) at Jacob’s well. In 1945, when AJ Cresswell revisited the battlefield, it was a “nondescript and uninhabited piece of rocky ground. It has no name, but the Arab who occupies a hut nearby claims that this is the ground that he, as a member of the Turkish Army, gave battle to the Cape Corps…”5 To get there they drove 30 miles north of the then limits of Jerusalem along the Nablus road. At Sinjil they turned off on a rough track that led to Termus ‘Aiya. From there they went along footpaths, east to El Mugheir, a hamlet from where some of the veterans were able to put names to the terrain features. No traces of the battle remained. Wild flowers then covered those rocky ranges.
The unit entered the line on the night of August 19 and, as Difford6 recalled, “curiously enough” faced the 53rd Division of Turkish 20th Corps! He put the position to the right of the Jerusalem-Nablus (Shechem in Biblical times) road, about 10 miles north of “Rham Alla” (Ramallah). C Company occupied Fusilier Ridge, A Company took over Idè Hill and B Company made Kh Abu Felah home. D Company was placed in reserve at Tay Wady, also home to battalion headquarters. The quartermaster was at “Mary Cross” and the transport column at Wady Dougal, about seven miles from Rham Alla. “The country was very rough, stony, and hilly, even precipitous in places. Trenches could not be dug and our defences consisted of sangars, stone and sandbag parapets and barbed wire.
The battalion came under artillery fire from daylight on August 19 and would remain so for the next month. “Though disconcerting and annoying, it was ineffectual so far as we were concerned, chiefly owing to strict attention to order to keep out of sight during daylight hours,” Difford wrote. The arrival of the Spanish flu a few days later forced a change in dispositions.
Orders for the September offensive came on the 4th of that month. Rehearsals and reconnaissance started shortly afterwards. On the 16th the brigade’s battalions thinned out the front lines and concentrated in their attack positions. On the 17th final preparations were made for the attack, scheduled for the night of the 18th/19th. Allenby’s main offensive was scheduled for the early hours of the 19th. The operations order of 160 Bde read as follows: “The brigade will make a night march and break through the enemy works on Wye Hill and advance along the watershed east of the Wady Samieh to Dhib and Square Hills with the object of entering the enemy’s main line defences at Valley View and about El Mugheir from the rear of those works.” The 1/17th (Loyal) Indian Infantry was designated the advance guard. Their objective was to seize a bridgehead across the Wady Samieh for the troops following. The artillery would then bombard Sh-el-Azier and Valley view. The 1/17th would closely follow the bombardment and when it lifted would assault Wye Hill. They would then go into reserve and establish pickets, except for a company designated to follow 1CC and mop-up certain defensive positions.
1CC was to follow the 1/17th, pass through them, and march along the watershed to take Dhib, Chevron, Crest, End and Square hills. Pickets would be dropped en route to protect the right of the advance. On arrival at Dhib and Square hills, the battalion would be responsible for protecting the flank of the brigade against attack from the east, north-east and north. They also had to make contact with the left of the 1/17th, who were following and were meant to relieve them on Chevron and Crest hills. When the 1/7th Royal Welsh Fusiliers (RWF) signalled the capture of Hill 2362, detachments were to be pushed forward to seize Kh Jibeit. The 1/7th RWF would follow in the trace of 1CC until they could push left via Tongue Hill. When the bombardment of Valley View lifted, they would push down the El Mugheir track to take Sh-el-Azier, El Mugheir proper, Boulder Boil and the already mentioned Hill 2362. The 21st Punjabis, again following in the trace of the 1/7th, would follow to Sh-el-Azier and then concentrate at the northern end of Valley View. In expectation of casualties, one colonel per brigade was ordered to remain in reserve at headquarters, along with one company commander per battalion, the junior captain and a subaltern from each company and as many NCOs as were thought necessary to help reorganise. Liddell Hart, who fought at the Somme, was such a subaltern. In his case, that part of his battalion that “went over the top” was obliterated. There was nothing to reorganise.
In the case of the 1CC, this meant that Maj Hoy would lead the battalion as LTC Morris was the designated colonel. He would rejoin the battalion later in the day to be wounded (twice) before the battle was over, once again leaving Hoy in command.
Zero hour was set for 2200 when Colonel Fagan of the 1/17th called down an artillery barrage. The brigade had 30 18-pounders, 12 4.5 inch and four six-inch Howitzers in support. His battalion advanced and quickly took their objectives – at a cost of 80 or so casualties. The unit also took 40 to 50 prisoners and seven machine guns. Immediately following the capture of Wye Hill, the Cape Corps went on, B Coy leading, towards Hill 2260 and Chevron Hill. After five minutes’ barrage, B Coy seized those objectives and after short bombardments Crest and End Hills also; thereupon A Coy took Dhib Hill without opposition … These operations had taken from 6.45 pm (September 18) to 4am (September 19). 1CC captured 181 prisoners (including 10 officers) that night. Forty-three of these, including two officers were taken by the intrepid SGT February and 20 men of C Coy, who were assisting signallers laying lines on the battalion left. “When they aw the enemy party advancing, they saw the enemy party advancing, they chucked down their wire, and, shouting, went for them with the bayonet. The 43, evidently believing a large force was advancing, ‘hands upped’, and February and his 20 minutes got the lot. For this and other good work that night SGT February deservedly got the DCM”, Difford wrote. That same night LCPL Thimm and the Lewis gun sections of C and D Coys captured an enemy field gun, the first of the campaign. For his exploit, he was promoted corporal. The gun is now on a monument to 1CC in Kimberley. A second gun was taken shortly afterwards.
At 10am the brigade commander redistributed of his forces, concentrating A and B Coys at Dhib Hill. They handed over the hill to the 21st Punjabis in the afternoon and went into reserve. News had by then reached them that the breakthrough along the coast had begun.
Now came the second scene. The situation finds the brigade with both its flanks secure. The only difficulty facing the unit was holding the enemy in position. By now they had all mustered at Kh Jibeit, Difford wrote, to cover their own retirement. The distance between forces was about 700 yards. Like the 1CC, the Turks also had secure flanks – Gallows Hill in the south-west and Outpost Hill in the east. “Here a reminder is necessary that all we had to do was hold on and keep as many of the enemy as possible busily engaged opposing us. The breakthrough and advance was to come from the coastal area, swinging round on us – the pivot. The next divisional move seemed obvious, i.e., to extend our advance along the high ground at Hindhead, which was lightly defended, if at all… But for some reason, of which we were unaware, it was decreed otherwise, and the Cape Corps was ordered to storm and capture the isolated and strong position of Kh Jibeit. It was isolated because we could not possibly draw in support from the flanks, owing to the nature of the terrain on either side.
That night LCPL Ruiters led a patrol to determine enemy dispositions and Morris made plans for his dawn attack, based on a design by Hoy. The idea was to assault and capture the main enemy defences in the centre by surprise attack in enfilade from the enemy’s right flank at 3am. There was to be a short preparatory bombardment. A and B Coy would form the main effort under command of MAJ Cowell and would attack in depth on the extreme western flank. Gradually, under dead ground that would be available after the first rush over open ground, the centre could be taken. One C Coy platoon (LT Bloxam) would protect the attack’s right flank. “This turned out to be one of the most strongly fortified of the enemy’s positions, though we were not aware of it at the time,” Difford writes, adding that a series of natural caves here gave the enemy shelter from fire. All possible care was taken in the planning and Hoy and the company commanders carefully studied the terrain. “From this point it has sadly to be recorded that things went hopelessly agley,” Difford wrote. They were further forward than the artillery could support. Then Morris briefed Cowell but confusion set in when an earlier set of orders arrived afterwards – because the runner bearing them had gotten lost. “Finally, about 5am, the order was given to attack at once without artillery preparation. Everyone knew full well what that meant, as it would be daylight before we would get to grips. Officers who fully realised the position shook hands with others standing by who were not going in…”
Immediately the advance started, it was met with terrific machine gun fie and casualties at once became very heavy. Lieutenant Stubbs (5Pl, B Coy) was the first officer hit immediately he went ‘over the top.’” By the time they reached a spur at Gallows Hill, the ranks were “considerably thinned,” and Lt White (Pl3, A Coy) was also down. Two machine guns and 20 Turks were taken. Hand-to-hand fighting, grenading and bayoneting took place. The Turks were reinforced and fighting became fiercer. Cowell, B Boy commanding officer (CO) and attack leader was mortally wounded. He called over A Coy CO CAPT Harris to hand over and say goodbye. Harris was struck dead as they shook hands. About the same time LTs Difford (2Pl, A Coy) and Vipan (Pl7, B Coy) were killed. Morris, already twice wounded, handed command back to Hoy and was evacuated.
C Coy was now pushed out to attack the enemy’s left and take Outpost Hill in order to relieve the pressure over on the right. This they did, but at a heavy cost. LTs Dreyer and Antill were killed and LT Rackstraw wounded three times in the rush. He and he other wounded had to be abandoned to the sun for most of the day, “as it was sacrificing life needlessly to send out stretcher bearers, so hot was the enemy’s fire.” D Coy was still holding Square Hill, but was also suffering casualties as it was only 700 yards from the Turks.
By now A and B Coys had lost seven out of eight officers. The Turks put in a counter attack and the surviving 1CC were ordered to retire on Square Hill. Lt Cloke (1 Pl, A Coy) was then hit, leaving both subunits entirely without officers. (4Pl, A Coy was commanded by SGT Jansen and 8Pl, B Coy was led by SGT JD Ross. With the main attack now considered a failure, C Coy was withdrawn. Its commander, CAPT Youart was now the only officer in A, B and C Coys. “This retirement won great admiration on all sides and commanding and senior officers who were watching operations from neighbouring heights were loud in their praise, both of the attack and the retirement – more particularly the latter, the historian later recorded.
The unit was keen to have another bash at the enemy, but the dearth of officers caused brigade to intervene. The 1/17th as sent in instead. They found he task comparably easy and suffered few casualties as artillery fire was again available to support the advance and the Turks had begun to retire.
Exactly 400 troops from A, B and C companies took part in the Kh Jibeit attack on September 20, and 152 became casualties. Forty-three lay dead on the field of battle, eight died of wounds later, 101 survived their wounds and one man was taken prisoner by the Turks. “This was of course o be expected in day fighting at close quarters,” Difford wrote, “the officers being readily picked off. Fighting was sometimes hand to hand. In fact encounters with fists and sticks actually took place.” The losses included six officers dead and seven wounded. “But the Cape Corps had not been defeated in battle – it had withdrawn under orders, gallant to the last,” Theseus7 wrote.
The 160th brigade did not see action again after September 20.1CC spent the next few days policing the battlefield and building roads, before withdrawing.
“So when the victory of Square Hill is rightly celebrated, each year when September comes, the failure of Kh Jibeit must also never be forgotten, and the high valour of the men from the Cape who would, had it been required of them, have gone on attacking to the last man rather than admit defeat,” Theseus added. But Kh Jibeit was soon forgotten and Square Hill is, itself, now seldom recalled. A monument was built in Kimberley. The gun captured at Square Hill stands there still, but of similar monuments in Johannesburg and Cape Town, nothing but promises materialised. The annual Armistice Day/Remembrance Sunday parade at the Johannesburg cenotaph drew a large Coloured crowd for decades and was widely known as the Square Hill parade, but even that memory has now faded.
World War One was a tragic mistake. We should not compound it by forgetting so heroic a sacrifice as that made by 1CC on September 20 or so splendid a victory as that won overnight September 18/19. Yet, with the passage of time we have. With the centenary of that great conflict approaching, now may be an appropriate time to again remember those who gave their today for our tomorrow. Without making a race issue of it, it is time that these glorious events take their rightful place alongside the SS Mendi and the needless sacrifice of 1 SA Brigade at what is now Delville Wood. It may be time to visit the graves of our fallen at Gaza, where they lie, it is passed time to erect a memorial to them at Square Hill in Palestine, where they fought, and make the odd pilgrimage there, as to the miniature Cape castle at Longúeval that marks the resting place of our fallen there. There is no doubt that some sympathetic businessman or company can be found to sponsor these, and perhaps also a wall of remembrance for Johannesburg and Cape Town to tell the story of 1CC, so that it is not again forgotten.
Epitaph
“I heard you are creating a Roll of Honour containing Cape Corps names. I had the honour of serving with many of the Cape Corps in Palestine and I should like to add my tribute of appreciation. The record of those of the Cape Corps who fought under my command is one what any troops might envy. Especially on September 19 and 20, 1918, they covered themselves with glory, displaying a bravery and determination that has never been surpassed.” Field Marshal Viscount Allenby, GCB, CGMG, 1919.
The following honours were awarded to 1CC after Square Hill and Kh Jibeit:
Military Cross:
- Lt EJ Rackstraw
Distinguished Conduct Medal:
- CSM K Hutchinson
- SGT M February
- CQMS AJ Hendricks
- SGT SD Jansen
- LCPL W Hutchinson
Military Medal (prompt award):
- LCPL J Ruiters
Mentioned in Dispatches:
- LTC CMG Morris, DSO
- MAJ Hoy, DSO
- CQMS AJ Hutchinson
- A/CSM J Scullard
Battlefield Promotion
CPL Thimm
The author thanks the SA Museum of Military History in Johannesburg and its library staff for their help in tracing these sources. Stilus Gladius Noster Est!
ENDS
1 Also consulted for this entry: Anon, Square Hill Veteran in retirement in Johannesburg, Indaba, January 1978; and Venter, Al J, Coloured, A profile of two million South Africans, Human & Rousseau, Cape Town, 1974.
2 His great grandson, Abdullah II, currently resides on the Jordanian throne.
3 Liddell Hart, Capt Sir BH, History of the First World War, Papermac, 1992.
4 Anonymous, Square Hill Battle survivor recalls Allenby’s campaign, Indaba, September 1967.
5 Creswell, AJ, Square Hill revisited – 54 years later, Springbok, April 1974.
6 Difford, Capt. ID, The Story of the First Battalion Cape Corps (1915-1919), Hortors, Cape Town, 1920.
7 “Theseus”, Square Hill and the Glory of Khjibeit, The Springbok, November 1957.